You’ve set up your business emails to work on Google Workspace. Smart decision. You can now use Gmail’s powerful spam filtering service as well as all of the other features that Gmail has to offer: our favorites are undo send (great if you spot a last-minute error), Send & Archive (because we like a clean inbox), Snooze (it’s important to reply to but isn’t urgent), and schedule send (for when you want it sent and out of your inbox but it needs to land in their inbox later).
So, DKIM authentication. You’ve got SPF sorted. That’s a small edit to your text-based SPF record in your DNS record. Two minutes, and it’s published, checked and done. DKIM is a little different. Google Workspace will tell you when your DKIM is authenticating (it will check when your keys are published and match the ones it gave you).
When you first set up DKIM in Google Workspace, the prompt on the screen tells you that you should wait around 48 hours from adding the record to asking the Workspace system to start authentication. But what happens if you’ve added the DKIM record to your DNS records (hopefully with Cloudflare or some other third party that isn’t your web hosting company), but it still isn’t authenticating after 48 hours, and you keep seeing the following status:
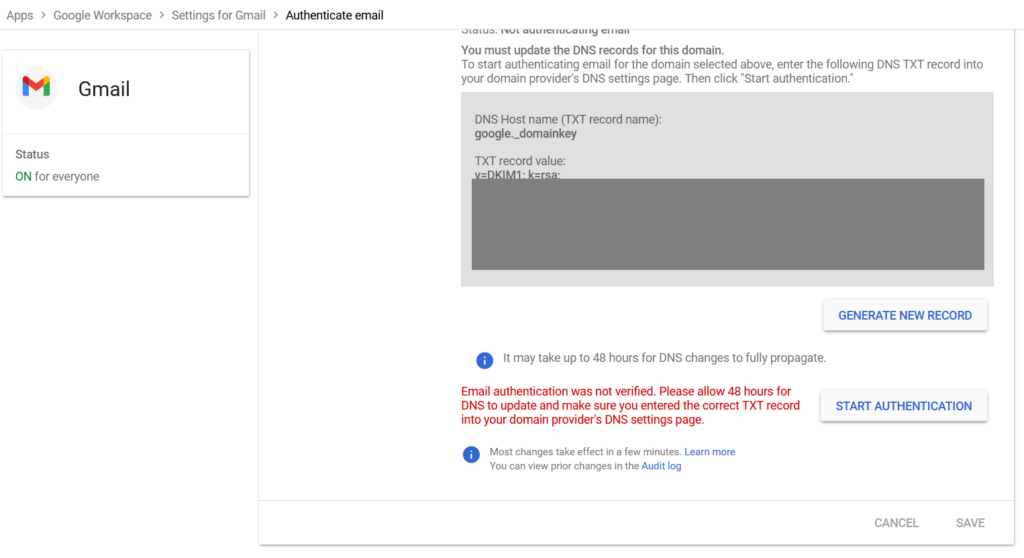
If you see this after 48 hours of adding the record to your DNS, there are a few steps to check whether you’ve added it correctly.
Step 1
Take the DKIM record that Google gives you and paste it into a text document on your computer (using Notepad or something similar). Then, take the DKIM record that is in your DNS records and paste it below the Google record in the text document. Head over to ChatGPT or another AI (any free ones will do) and ask it to compare the records and check that they’re the same.
If they’re not the same, generate a new record (by hitting the generate new record button a few times) and repeat the authentication process.
Step 2
ChatGPT or another AI program says that the two records match? Have you also waited 48 hours for the records to be fully published? If you answered yes to both of these, there might be another hiccup. This hiccup usually occurs when attempting to re-authenticate a domain previously authenticated through DKIM on Google Workspace.
The best thing to do is head over to MXToolBox and use their DKIM checker to pull any new record to the front and release the cached version. We’ve run across this issue a few times, and all of those times, the DKIM txt record was cached in the DNS, regardless of whether the previous record was deleted and a new DKIM txt record was added. Strange? Yes.
Enter your domain name and the selector into the tool and hit the button. The selector is most probably “google” if you didn’t change it in the original domain keys (DKIM) record you’d set up with Google Workspace before (see the screenshot above).
Step 3
Head back to your admin panel in your Google Workspace account, head to Apps > Google Workspace > Gmail > Authenticate Email, and choose the domain you are working on from the abovementioned steps. Then hit the “START AUTHENTICATION” button, and the status at the top should change to “Authenticating email with DKIM.”
Is there anything else that can affect this?
Yes. If you’ve recently changed your Google Workspace account’s primary domain name, you’ll need to re-authenticate all domains in the account. Once you’ve changed your primary domain, remember that you should switch the domain/email address associated with your payments account and all other elements in all other parts of your account. Unfortunately, Google doesn’t do this automatically.
Then, once you’ve changed everything, you’ll need to re-authenticate the primary domain. A word of warning: when you’re re-authenticating through DKIM and changing the primary domain, we suggest generating a new DKIM record. Why? Most times, the system requires it. Hit the generate button a few times to ensure you have a brand-new record, and then add that to your DNS records.
Once that’s done, you’ll need to remove and add all of the other secondary or alias domains to the account so that they are added to the new primary domain. Yes, it’s annoying, and yes, it doesn’t require any additional text records or CNAME records for Google to add the domains back to the account (because it did this in the first place). However, suppose you don’t re-add all of the domain to the primary domain name. In that case, Google will still block the receiving of emails to the account from all of those secondary or alias domains associated with the old primary domain. Dumb? You betcha, but it is what it is.
If all of the above seems like a massive headache, you can always reach out to us at DNS Ninjas, and we can take care of everything for you.